Super Easy Natural Homemade Butter!


How to make homemade all natural butter! Super easy with step by step pics! Makes such soft and creamy butter!


Wow 3 posts in one week! That sure is a first for me…here's hoping I can stick to a more consistent posting schedule! Today I'm sharing a really neat 'recipe'. The reason I put a ' ' around the recipe is that it's not so much a recipe but an old method that has been used for centuries by humans – namely, butter. Most of us who have been born and raised in big cities have never been exposed to the process of making butter. Sure, we know it comes from milk, which comes from cows, but that’s about where most people's knowledge on the butter making process ends.

 Back when I was in third grade, our class had a 'live like a pioneer day', where we were supposed to dress up like pioneers and live as they would have. This included no electricity or paper, which meant working on mini chalkboards with the lights off! This was quite fun for a third grader and we really enjoyed the experience. But what made it even more fun was, the thing that makes everything more fun, the food! In class we made our own bread by mixing up the flour with the rest of the ingredients, and setting it out to poof. Then our teacher baked the bread during lunch break in the staff's kitchen. It was all really amazingly fun, and it’s a memory I still think back on and smile. But perhaps what was most fascinating to 8 year old Zahra was what we made in class to go 'on' the homemade bread – homemade butter! Our teacher poured some whipping cream into a jar, and screwed the lid really tight. She then asked us to sit in a circle and pass the jar around one by one, with each of us shaking the jar vigorously with our hands until we couldn’t shake anymore! I remember being both skeptical and in awe….could *we*, the young little children of room 3, truly, possibly, make… butter?! SO shake, and shake, and shake we did, each of us hoping that *we* would be the one who made the magical shake that turned the cream into butter. Finally, after a good 20 minutes of shaking the cream, EUREKA! We had butter! Of course it was a bit soft and liquidy, but we didn’t care! We made butter! We slathered it on some of our homemade bread, and boy was it a delicious snack on a dark (since the lights were off) afternoon.


Make super soft and creamy homemade butter! Super easy with step by step pics!

Since then I have always wanted to go back and 'try' it myself – to recreate this homemade butter, but this time do it 'right'. You know. The adult way. However, every time I needed butter I would do the normal 'adult' thing to do – which was buy it from the grocery store. However, about a week ago I was helping my mom with the groceries when I noticed the whipping cream we usually get was on sale. I grabbed a package of it, with the plans of baking something (wasn’t quite sure what yet), and headed to the cash. However, at the cash I realized ' aww man, I forgot the butter!' Anyone who has walked alllll the way across a huge grocery store to the check-out cash, only to remember that they forgot to pick something up on the other end of the store, will know that you will come up with any excuse to NOT go back. At that moment while holding a 1L container of whipped cream, all I had to do was look down at the excuse I was so conveniently holding – I'm going to make some homemade butter! :D

So here it is - how to make butter. It's surprisingly easy and actually makes a delicious final result! It’s a very nice fluffy and SOFT butter that you just don't get in the store bough kind. Best of all, it's healthy, natural, and preservative fee! And if you like you can even buy organic whipping cream and make some organic butter! Yum! 

So lets begin, I've outlined the basic ingredients and steps needed, but this needs a bit more of a visual so I have some step by step photos / personal tips for you too. 


How to make homemade all natural butter! Super easy with step by step pics! Makes such soft and creamy butter!

Homemade Butter

  • Whipped cream – at least 35% (nothing less)
  • Salt to taste (optional) – I make unsalted butter
  • ICE COLD water
  • Something to make it with. I made it in my kitchen aid mixer, but you can make it with a hand mixer or even a jar like I did in the third grade :) 
  1.  Pour your cream (no measurement… however much you want. I used ¾ of a 1L container but you can use more or less depending on how much butter you want) into your stand mixer. Beat the cream at low-medium speed until it turns into whipped cream. Then beat at high speed until the cream curdles and makes chunks.

  2. At a certain point it will start 'leaking liquids'. At this point you want to cover your mixer with a cloth or plastic wrap to prevent splashing. Keep beating until you have hard formed butter in your mixer (see pics below). At this point you want to drain that liquid out – but keep it! This is butter milk and can be used in lots of yummy recipes!

  3.  Add some ICE COLD water to your butter (1/2 – 1 cup depending on how much butter your making). Beat the butter and ice cold water together (be careful of splashes!) for a few minutes. Then stop and drain the water (it will be a bit murkey). Then repeat the same steps again. I do it about 3 times or until the water is kind of clear. This is done to 'clean' your butter and draw out all the moisture. This allows your butter to last longer without going bad. If you are going to consume your butter in the next few days then you can skip step 3.

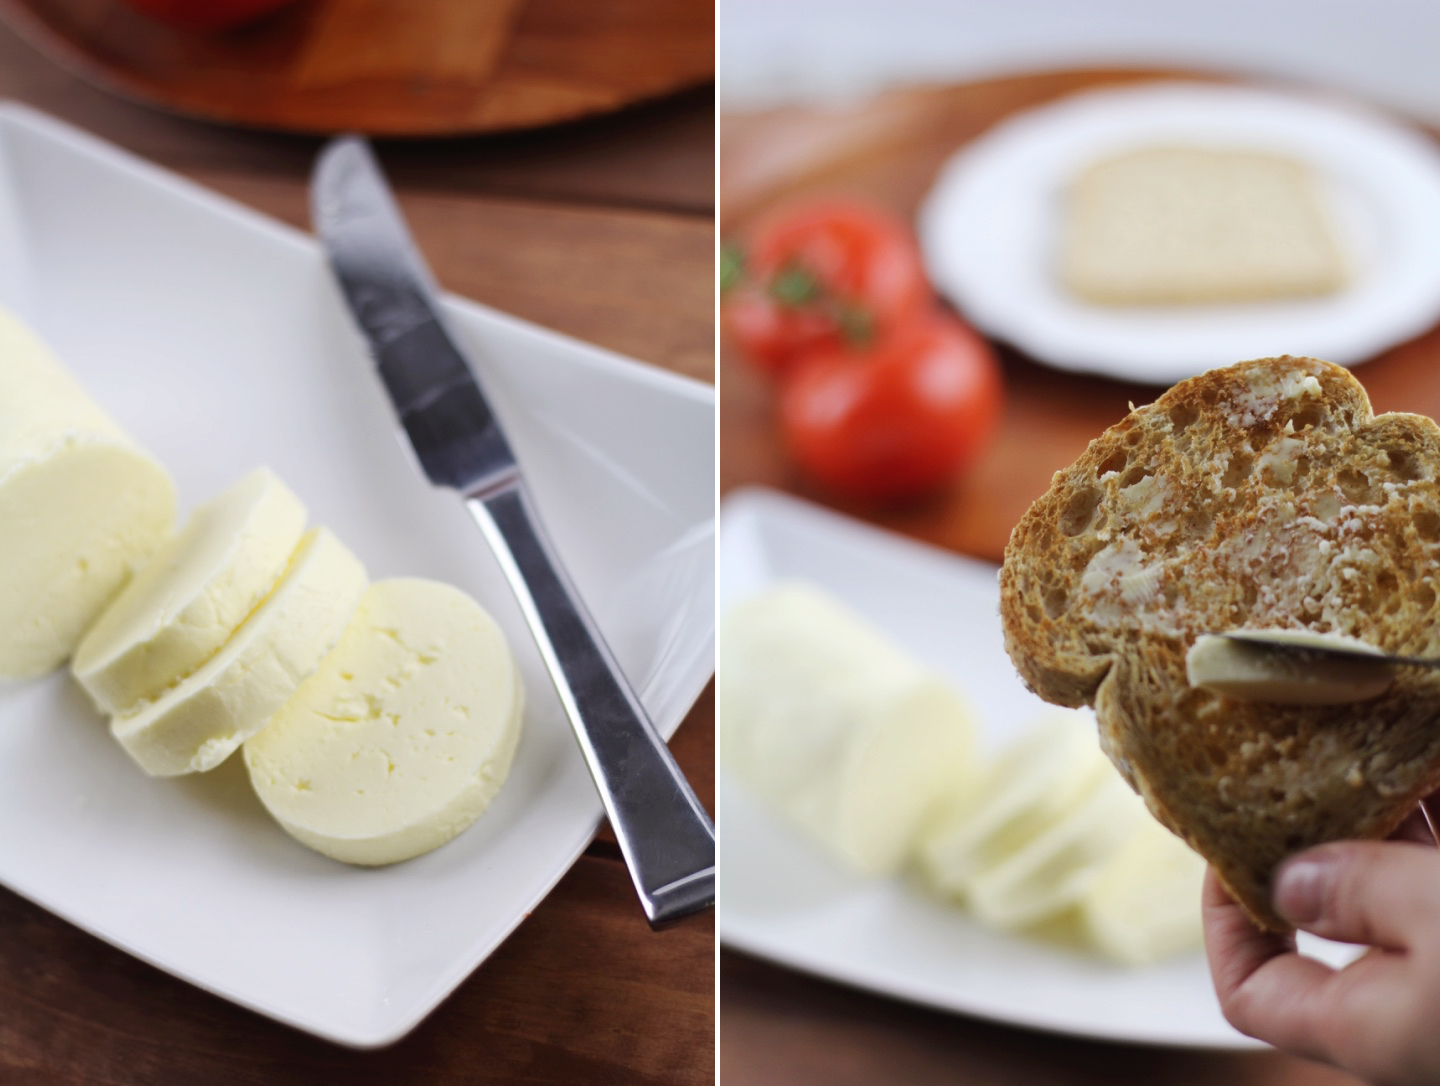
  4.  And that’s it! Once you have beaten the ice water with the butter to the point that the water isn’t too murky, you can drain the remaining water and 'pat' the rest out with your spatula. And there you have it! Butter! You can put it in an airtight container and it lasts for a good month!


And heres a visual of the above, which is also pinnable! :)

a step by step tutorial on how to make homemade organic butter! (theres two parts)
how-to-part-2.jpg


a great guide on how to make homemade all natural butter! Who would have thought butter could be so easy to make at home? and so soft!

Super Soft Thumbprint Butter Cookies

These cookies are seriously sooo quick and easy to throw together (only 5 ingredients!) and make the yummiest melt in your mouth butter cookies. These thumbprint cookies are a great addition to my Christmas cookie plate!

OH. EM. GEE. 

YA GUYS. These cookies. They are to die for. Not only are they super soft and just *melt* in your mouth, they are super, duper, easy to make. Like I'm talking ONLY 5 ingredients! It's so easy and has ingredients that any basic pantry would have. This may lead you to think "well it can't be so good if it's so basic". But you would be wrong, friend. Very wrong. 

I like to make a batch of these to take to work around the holidays and they are always a great hit. Its a very simple cookie and appeals to most palettes, and you would be hard pressed to find someone who 'hates' soft melt in your mouth butter cookies. In fact they were so good my health conscious boss even asked for seconds!

These cookies are thrown together real quick but make a really nice, smooth, easy to work with dough. I used my kitchen aid mixer, but you can of course use a regular mixer. Its just a basic 'mix your butter with sugar, beat, then add the rest' kind of recipe. The result is a super delicious butter cookie that melts in your mouth. They are great both warm and cooled. They aren't too sweet so its a great 'base' cookie - the cookie itself is soft and melt-y, but you can add other treats to make it sweet such as jam, chocolate, and icing sugar.

Its a great Christmas cookie recipe, but honestly I would have them all year round. Its a great base so I plan on trying different recipes in the next little while to see how they come along. So if you are looking for a great quick and easy Christmas cookie look no further than these soft butter cookies. Ok. I think I might have accidentally over hyped these cookies, thus causing extremely high expectations that no cookie could live up to. Forget what I said. They are just 'meh' cookies. 'Meh' cookies that I highly suggest you make ;)


These cookies are seriously sooo quick and easy to throw together (only 5 ingredients!) and make the yummiest melt in your mouth butter cookies. These thumbprint cookies are a great addition to my Christmas cookie plate!
5.jpg

Soft Thumbprint Butter Cookies

Ingredients: 

  • 1 cup softened salted butter (BE SURE to use butter - no margarine here please!)
  • ½ cup icing sugar, plus a little more for dusting the cookies at the end
  • 2 teaspoons vanilla
  • ¼ teaspoon salt
  • 2 cups flour
  • ½ cup jam (any flavour but I usually use Strawberry or Raspberry)
  1. Preheat oven to 325°F. Line a baking sheet with parchment paper. Be sure to do this because unlike other cookies made with a high butter base these cookies stick to the pan!

  2. In a bowl (or your kitchen aid mixer with the paddle attachment), beat the butter and sugar together until light and fluffy. Add vanilla and salt. Switch to low and gently mix in flour, just until combined - you don't want to over mix!

  3. Roll balls of dough into 1-inch balls (about 1 tablespoon each). Place dough balls on parchment lined baking sheets. Press down the center of each ball with your thumb (they are thumbprint cookies after all!). I have also used the back side of my teaspoon measuring spoon before too!

  4. Fill centers with a teaspoonful of the jam of your choice. Bake 12-15 minutes, making sure to not over bake. The baking of these cookies is a bit special - when they are ready they wont look ready because they wont get golden brown on the tops. That's ok. We don't want them to! When it gets golden on the top it means its over baked and will result in a dry cookie. Instead, to check if the cookie are ready carefully check the undersides to see if they are golden. If the cookie lifts (it wont if its not baked) and is golden underneath you are good to go! Let them cool on the baking sheet, then transfer to cooling rack.

  5. When cookies are completely cooled (otherwise it will melt into the cookies), dust with icing sugar. Cookies can be kept in a container for a few days (though they probably wont last that long!)

If you try the other flavours let me know how they turned out :)


These cookies are seriously sooo quick and easy to throw together (only 5 ingredients!) and make the yummiest melt in your mouth butter cookies. These thumbprint cookies are a great addition to my Christmas cookie plate!
quick and easy Christmas cookie recipe anyone? Super soft butter cookies that just melt in your mouth :)


Strawberry Sunshine Tea Cake

Over the weekend I headed in to the kitchen with the intention of baking up some sort of cake. I was in the mood for something smooth, and fluffy, and, well, cakey. However, I didn’t have any specific recipe in mind as I kept opening and closing the same kitchen cabinets, trying to find something to inspire me. I knew I wanted cake, and I knew a nice Valentines Day theme would be cute, and I was also thinking about something ‘cheerful’. “What? How can cake be cheerful??” I hear you cry, very easily I reply, it has to make you smile. Or something like that. You know how a yummy berry fruit tart makes you think of lovely summer, or how a peach crumble pie makes you think of a sunny spring weekend? Well I wanted to feel me some sunshine cause the reality of -35C weather outside just wasn’t cutting it. That’s when I saw the bowl of strawberries in the back of our fridge and it hit me – strawberries! Sunshine! Oh joy! I will make a strawberry cake.

strawberry tea cake | www.livingthelovely.com


Then I set about on Pinterest looking for the perfect recipe – which turned out to be a bad idea. Not only did I not find the type of recipe I was looking for (think a soft summery strawberry tea cake), I ended up side tracked an hour later looking at an article on what my personality type was, and what career I am best suited for (apparently I would make a great Carpenter or Mechanic – which is surprising given that I can’t tell the difference between a wrench and a screwdriver half the time). Frustrated with the inability of the internet to tell me WHAT I SHOULD DO WITH MY LIFE, I went back to figuring out what on earth I was gonna make. I finally settled on making an old classic I had made before at my previous blog, a simple strawberry tea cake. However, taking note from my previous attempt, I decided to make some changes to make the cake more moist (it had turned out a tad dry previously).


I decided this would be a great opportunity to use some Greek yogurt to not only make this cake moist, but also somewhat healthier (hey every bit helps right?). I was pretty happy with the final result! I decided to give it a Valentines Day theme by being all classy and cutting the Strawberries into thin slices and decorating with borders around the cake. I also made a little strawberry heart in the center. How cuutttteeeee right?


How it turned out: This recipe turned out pretty great! If measuring by nothing but the fact that it was all gone about 20 minutes after I took these pics, I would say the family loved it! The Greek yogurt did a great job of adding the moisture I was looking for. This produces a really great rich and dense cake, which would be a great ‘tea cake’ in my opinion. So if you are looking for a summer strawberry tea cake recipe, give this one a go! Also, this produces a bit of a sweet cake, so if you would like you could probably cut out ¼ cup of the sugar and still be good.


strawberry tea cake | www.livingthelovely.com

Strawberry Tea Cake

Ingredients:

1/3 cup unsalted butter, at room temperature

1 1/2 cups all-purpose flour

1 1/2 teaspoons baking powder

1/2 teaspoon salt

1 cup granulated sugar

1 large egg

1/2 cup Greek Yogurt *or substitute the water + Greek yogurt for 1 cup of regular Yogurt

1/2 cup of water

1 teaspoon vanilla

 2 cups of strawberries (or less or more depending on what you like)

1 tablespoons sugar, for sprinkling on top of the strawberries

Some Icing sugar to dust on the cake once its baked.


Directions:

1. Preheat oven to 350 degrees. Line your cake pan with parchment paper. 

2. Sift flour, baking powder, and salt together into a separate bowl. Set aside.

3. Sprinkle some sugar over your strawberries if they aren’t naturally very sweet like mine, and set aside.

strawberry valentines day cake | www.livingthelovely.com

4. Mix your greek yogurt and water together in a bowl until the lumps have mostly dissolved. Set aside.

greek yogurt add to batter

5. Beat your butter and 1 cup sugar in a bowl with an electric mixer. Mix until pale and fluffy. Add in egg, Greek yogurt/water mixture (or instead use 1 cup of regular yogurt), and vanilla. Mix until well combined. Now when you add your yogurt mixture to the batter it may make it look super gross. Like its curdled and gone bad or something. ITS OK. Just continue. Trust me on this.

6. Gradually mix in your flour mixture to the gross looking buttery mixture. (tada! It now looks like a really good thick cake batter).

7. Transfer the batter into your pan (It’s a really thick batter so its ok if it resembles something like a very soft bread dough). Arrange your strawberry slices on top of the batter.

8. Bake in the oven for about 20-25 minutes. Be sure to adjust baking time for a hotter or cooler oven.  Bake the cake until a toothpick entered in the center of the cake comes out clean. This cake actually ends up with a pretty white top. If you prefer a golden topped cake, put it under the broiler for a few minutes like I did. (tastes great either way)

9. Once cake is COMPLETELY cooled, sprinkle on some icing sugar to make it extra special