Quick and Easy Triple Berry Tart Recipe

Hello!!

Long time no post! I'm so very sorry. Seems like I'm failing on those new years resolutions already! *fail* But I *do* have a good reason! Kinda. Sorta. See back in late January I ended up taking a very last minute (I'm talking a few days notice) 3 week vacation, which made it really difficult to update regularly! Not for lack of trying though! I had even prepared a Valentine's day recipe and a DIY craft, and photographed it all the night before my departure and was planning on posting updates while on my vacation. Unfortunately I ran into some unforeseen problems with internet connection while I was there – I was promised high speed wifi and was left with internet that wouldn’t even connect!

Alas, after many, many, many frustrating attempts to connect to the interwebs I took it as a sign from the universe to just chill and actually *be* on vacation. So I did! However, when I got back I ended up getting really sick (caught something awful on the plane ride back), and then drowning in work (it happens when you take 3 weeks off). After all that, life caught up with me and things have been really busy, and before I knew it its been 3 months!

However, all this time away doesn’t mean I have been doing nothing worthy of blogging about! Oh contrer! If you follow me on Instagram you will see I have been preoccupied with starting up a garden and many other fun stuff. I've been trying lots of new things and new recipes and am excited to come back with lots of fun new content! :)

quick and easy triple berry tart recipe. What I love about it is its no bake, only 5 ingridients from the pantry, and super simple. But it  LOOKS fancy! All the look none of the work ;)


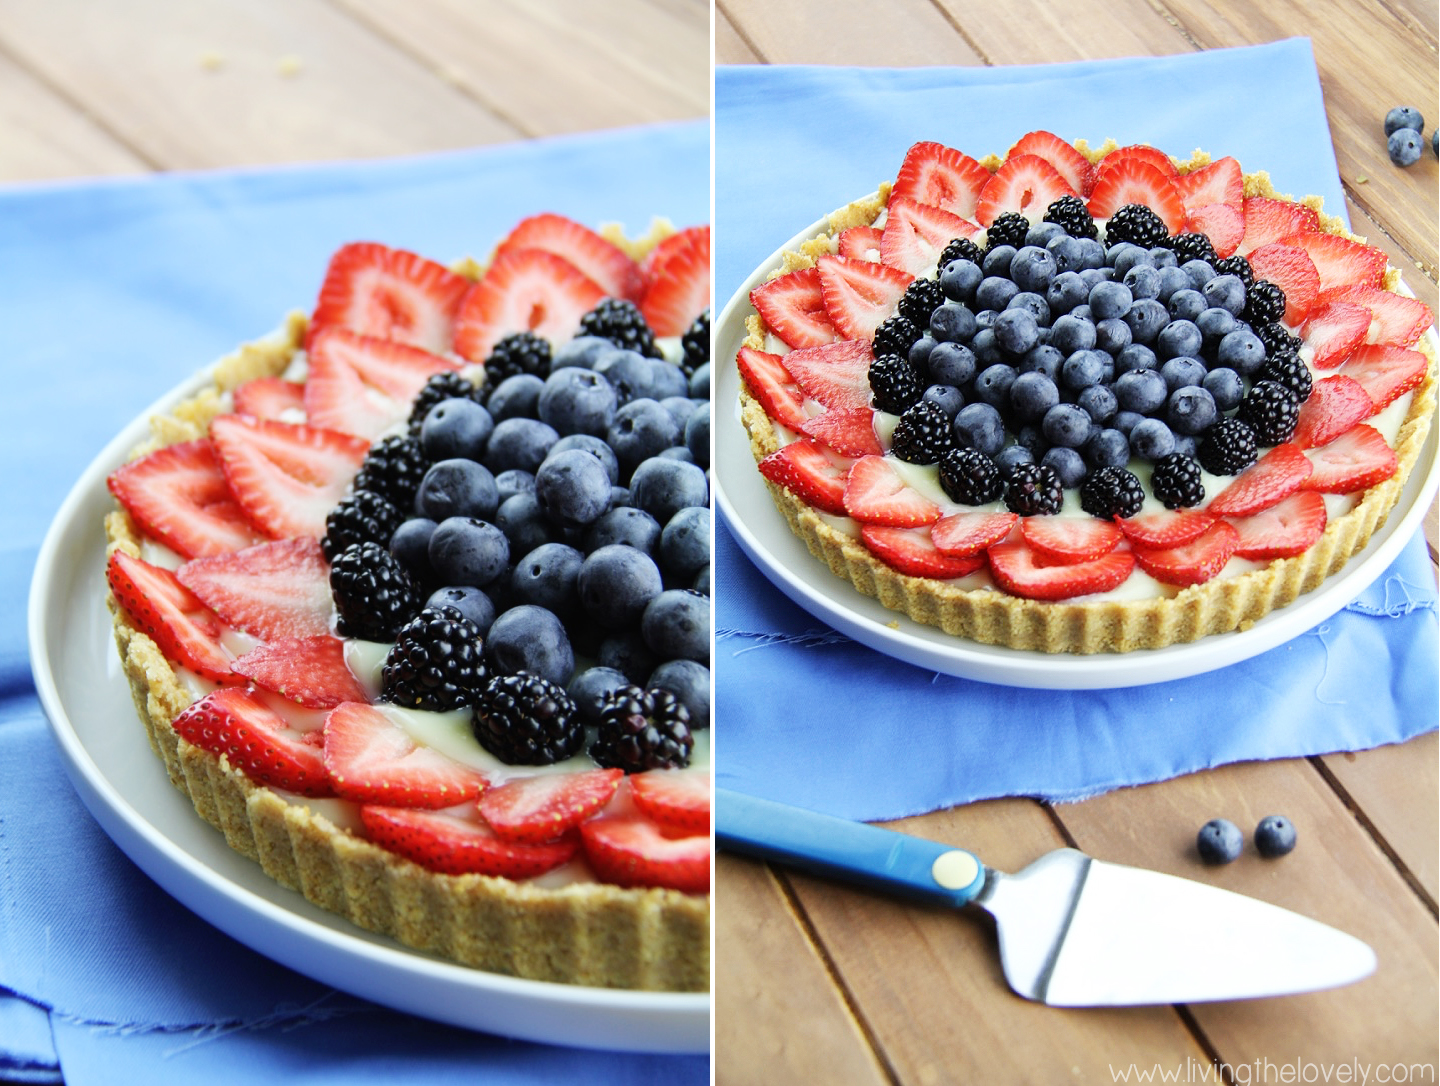
So in order to make it up to you, here's a recipe for a super easy and super delicious Triple Berry tart which really signals that summer has arrived!! If you have been super busy like me, but need a quick delicious dessert, that also makes a statement, then look no further! This is really great for when you want to make a great homemade dessert for a party or special event, but don’t have the time (or just feeling too lazy) to make anything too complex. And what with the crazy heat of summer well on its a way, its a great dessert to take to your neighbourhood bbq which has the added bonus of not needing to turn on your hot oven!

quick and easy triple berry tart recipe. What I love about it is its no bake, only 5 ingridients from the pantry, and super simple. But it  LOOKS fancy! All the look none of the work ;)


This tart can easily be changed and customized in endless ways to whatever fruit you have whether it be different types of berries, or perhaps banana slices, or kiwi, or even some peaches! You could even change the pudding flavours!

So make this super quick and easy Triple Berry Fruit Tart and let me know how it goes 😃

quick and easy triple berry tart recipe. What I love about it is its no bake, only 5 ingridients from the pantry, and super simple. But it  LOOKS fancy! All the look none of the work ;)


Triple Berry Tart

* 10 sheets of graham crackers, crumbled up (or roughly 1.5 cups)
* 1/3 cup sugar
* 1/2 cup of melted butter
* 1 pudding packet (I used Jello brand that serves four)
* Milk as required by pudding packet
* Fruit to Decorate

1. Break up your graham cracker cookies into smaller pieces by hand, and then place in to a ziplock bag. Seal firmly. And bang it with a rolling pin! (great therapy! lol) keep banging it until its nice and crumbly.Once completely crushed pour crumbs into a large bowl. If you don't have cookies but rather the crumbs, this should equally roughly 1.5 cups, so measure that and pour it into a bowl.

2. Add your sugar to the crumbs and mix until throughly incorporated. Then add in your melted butter and mix! Depending on a variety of things you may need a bit more cookies or a bit more butter. You want to be able to mix it to the point where it becomes like sand that will hold its shape when squished down.

3. Take your tart pan and press it all down in the pan to form a crust. Place in the fridge to set for a few hours. 

4. Prepare your fruit topping - wash and slice!

5. Once the crust has set in the fridge, prepare your pudding mix by mixing the required powder to milk mixture called for on the box. It will be liquidy at first but if you keep mixing it will thicken! Pour your thickened pudding mixture into the tart. Decorate with Fruit. Place in fridge to set until ready to be served!

Bon apetite! 😃 

quick and easy triple berry tart recipe. What I love about it is its no bake, only 5 ingridients from the pantry, and super simple. But it  LOOKS fancy! All the look none of the work ;)


Apple Tea Cake

Hey all!

Look at me posting twice in one month ;) Fingers crossed I can keep this whole blogging thing going!


So I know I just posted a post about healthy eating and here I am posting a cake recipe #Fail.

BUT this is a healthy cake! Kinda. See we have apples, which are a fruit. And we have ... umm...cinnamon which is a very healthy spice. And....and....we have GREEK YOGURT! That's right. Super healthy :)

The inspiration for this came about because I wanted to bake something 'Fall-ey' and whats more reminiscent of fall than big red apples? This cake didn't actually turn out quite the way I hoped, but it was still pretty good! I was hoping to get an extra moist and slightly lighter cake with the apple slices on top,  but it turned into a much heavier and denser cake. It still tasted lovely but wasn't quite what I was going for. I would categorize this as more of a heavier 'tea cake' - nice and dense and short, it would be really cute to have as a side with a cup of hot tea with some friends.

So if you are looking for a fall inspired apple cake recipe that is simple and easy to make but also looks really pretty too, look no further than this easy apple tea cake!


5.jpg


Simple Apple Tea Cake

  • 1 1/2 cups flour
  • 1 1/2 teaspoons baking powder
  • 1/4 teaspoon salt
  • 1.5 teaspoon cinnamon
  • 1/2 cup butter
  • 2/3 cup sugar
  • 2 eggs
  • 2 teaspoons vanilla
  • 1/2 cup Greek Yogurt
     
  • 4-5 apples
     
  • 4 tablespoons granulated sugar
  • Cinnamon to taste

     
  • Icing Sugar for dusting


1. Begin by mixing flour, baking powder, salt, and cinnamon until thoroughly blended. Set Aside.

2. Beat the butter and sugar together until light and fluffy. Mix in eggs, one at a time, until thoroughly blended. Add Vanilla. 
Note: If you have lumps or it looks kind of curdled its OK! Just keep mixing, and when you add the rest of the ingredients you should get a nice smooth batter.

3. Then mix in your dry ingredient and your greek yogurt alternating between ingredients. Add flour, add yogurt, add flour, add yogurt...continue until you have added all the ingredients. I found it helpful to throw in a bit of the flour mixture, then toss in greek yogurt by the spoonful. Mix until thoroughly combined.

4. Preheat your oven to 350. Line a 9x13 baking pan with parchement paper, extending it out a bit from the sides so its easier to take the cake out once its baked.

5. Spread batter into pan. It will be *really* thick. Just spread it around as evenly as possible throughout the pan.


6. Peel and slice your apples and place on the batter.

Note on the apples: I find it looks 'prettiest' when you slice your peeled apples like this. First you slice them in half, and then you place them on your board and cut vertically down making lots of nice thin slices. I then find its best to arrange them on the cake starting from the corner farthest away from you and placing the apples towards you, rather than the opposite way. It still works the other way but its prettier this way :)

7. Bake in the oven for 30-40 minutes depending on your oven's temperature or until a skewer poked into the cake comes out clean AND the apples are nice and soft and baked.


8. Allow to cool at least slightly before sprinkling on some icing sugar! And Enjoy! :)


Strawberry Sunshine Tea Cake

Over the weekend I headed in to the kitchen with the intention of baking up some sort of cake. I was in the mood for something smooth, and fluffy, and, well, cakey. However, I didn’t have any specific recipe in mind as I kept opening and closing the same kitchen cabinets, trying to find something to inspire me. I knew I wanted cake, and I knew a nice Valentines Day theme would be cute, and I was also thinking about something ‘cheerful’. “What? How can cake be cheerful??” I hear you cry, very easily I reply, it has to make you smile. Or something like that. You know how a yummy berry fruit tart makes you think of lovely summer, or how a peach crumble pie makes you think of a sunny spring weekend? Well I wanted to feel me some sunshine cause the reality of -35C weather outside just wasn’t cutting it. That’s when I saw the bowl of strawberries in the back of our fridge and it hit me – strawberries! Sunshine! Oh joy! I will make a strawberry cake.

strawberry tea cake | www.livingthelovely.com


Then I set about on Pinterest looking for the perfect recipe – which turned out to be a bad idea. Not only did I not find the type of recipe I was looking for (think a soft summery strawberry tea cake), I ended up side tracked an hour later looking at an article on what my personality type was, and what career I am best suited for (apparently I would make a great Carpenter or Mechanic – which is surprising given that I can’t tell the difference between a wrench and a screwdriver half the time). Frustrated with the inability of the internet to tell me WHAT I SHOULD DO WITH MY LIFE, I went back to figuring out what on earth I was gonna make. I finally settled on making an old classic I had made before at my previous blog, a simple strawberry tea cake. However, taking note from my previous attempt, I decided to make some changes to make the cake more moist (it had turned out a tad dry previously).


I decided this would be a great opportunity to use some Greek yogurt to not only make this cake moist, but also somewhat healthier (hey every bit helps right?). I was pretty happy with the final result! I decided to give it a Valentines Day theme by being all classy and cutting the Strawberries into thin slices and decorating with borders around the cake. I also made a little strawberry heart in the center. How cuutttteeeee right?


How it turned out: This recipe turned out pretty great! If measuring by nothing but the fact that it was all gone about 20 minutes after I took these pics, I would say the family loved it! The Greek yogurt did a great job of adding the moisture I was looking for. This produces a really great rich and dense cake, which would be a great ‘tea cake’ in my opinion. So if you are looking for a summer strawberry tea cake recipe, give this one a go! Also, this produces a bit of a sweet cake, so if you would like you could probably cut out ¼ cup of the sugar and still be good.


strawberry tea cake | www.livingthelovely.com

Strawberry Tea Cake

Ingredients:

1/3 cup unsalted butter, at room temperature

1 1/2 cups all-purpose flour

1 1/2 teaspoons baking powder

1/2 teaspoon salt

1 cup granulated sugar

1 large egg

1/2 cup Greek Yogurt *or substitute the water + Greek yogurt for 1 cup of regular Yogurt

1/2 cup of water

1 teaspoon vanilla

 2 cups of strawberries (or less or more depending on what you like)

1 tablespoons sugar, for sprinkling on top of the strawberries

Some Icing sugar to dust on the cake once its baked.


Directions:

1. Preheat oven to 350 degrees. Line your cake pan with parchment paper. 

2. Sift flour, baking powder, and salt together into a separate bowl. Set aside.

3. Sprinkle some sugar over your strawberries if they aren’t naturally very sweet like mine, and set aside.

strawberry valentines day cake | www.livingthelovely.com

4. Mix your greek yogurt and water together in a bowl until the lumps have mostly dissolved. Set aside.

greek yogurt add to batter

5. Beat your butter and 1 cup sugar in a bowl with an electric mixer. Mix until pale and fluffy. Add in egg, Greek yogurt/water mixture (or instead use 1 cup of regular yogurt), and vanilla. Mix until well combined. Now when you add your yogurt mixture to the batter it may make it look super gross. Like its curdled and gone bad or something. ITS OK. Just continue. Trust me on this.

6. Gradually mix in your flour mixture to the gross looking buttery mixture. (tada! It now looks like a really good thick cake batter).

7. Transfer the batter into your pan (It’s a really thick batter so its ok if it resembles something like a very soft bread dough). Arrange your strawberry slices on top of the batter.

8. Bake in the oven for about 20-25 minutes. Be sure to adjust baking time for a hotter or cooler oven.  Bake the cake until a toothpick entered in the center of the cake comes out clean. This cake actually ends up with a pretty white top. If you prefer a golden topped cake, put it under the broiler for a few minutes like I did. (tastes great either way)

9. Once cake is COMPLETELY cooled, sprinkle on some icing sugar to make it extra special

Super Soft Gingerbread Men Cookies

Hello Lovelies!


I was originally hoping to get this post out before Christmas, but since I was making them fresh for Christmas it kind of ended up not happening for logistical reasons. But oh well. Better late than never right? Especially in the case of these yummy soft gingerbread cookies ! 


soft ginger bread cookies recipe. Super delicious and very easy to make, these cookies are firm but super soft when you bite into it! My favourite gingerbread recipe ever! www.livingthelovely.com


So backing up a little, I thought I should provide a wee bit of background: Despite not actually celebrating Christmas, every year I try to get a little something for my coworkers. Nothing crazy but just a little something to spread the merriness of the season. It does sometimes confuse people that on one hand I don’t celebrate Christmas, yet on the other hand I do the whole gift thing. My response is simple: Tis the Season! I love that it can brighten up people’s day, and, I mean, really, no one is complaining right? :)


But my problem this year is I joined a new team at work, and theres about 12 people on it. That made the logistics of buying gifts a bit more complicated. But not wanting to do nothing I decided it would be the perfect opportunity to show off some of my baking skills at work. I decided to make something Christmas-ey, and then it hit me - Gingerbread cookies! 


Now I don’t know about you, but my ideal gingerbread cookie recipe consists of a soft chewy cookie filled with flavour. I have always hated those hard, crispy, break your tooth gingerbread men that were the only option at your local grocery store. This, my friends, is not that! 


These soft gingerbread cookies are, well, very soft. Not too soft, in the “oh no! my cookie just crumbled in my hand cause it was too soft” sort of way. In fact the texture on the outside is pretty stiff and solid. But when you take a bite in to it, its very soft and not tooth break-ey. The great thing about these cookies are that they stay soft even a few days later (though you probably won’t have very many left!). 


Decorating these soft gingerbread man? gingerbread men ? gingerbread cookies? whatever you wanna call them, is also super fun. Get some icing and candies and go to town. Since this was the first time I was going through the bother to decorate (this was a gift people, a messy piled on smear of icing wasn’t going to work here) I decided to make each of the cookies different which was lots of fun! I then finished it up by wrapping them up in some creepy looking but STILL FESTIVE baggies, and topping it off with ribbons. This was clearly a classy affair. 


I would highly recommend them and they were a hit in the office, so if you are looking for a SOFT gingerbread man cookie recipe, this is the one people!


1.jpg


Soft Gingerbread Men Cookies


* 1 1/2 cups unsalted butter (softened at room temp)

* 1 cup brown sugar 

* 2 large eggs

* 1 cup molasses 

* 1 tsp baking soda

* 3/4 tsp salt

* 1 tsp. cinnamon

* 1/2 tsp  ground cloves

* 2 tsp ground ginger

* 5 cups flour


1. Mix your softened butter with brown sugar with a pair of beater or your kitchen aid mixer. Beat until its smooth.

2. Then add your 2 eggs to the mixture and mix some more until fully incorporated. Add the molasses and mix. Just a note here that I use Blackstrap which makes a darker cookie but you can do the normal kind too. I just prefer the richer taste of the Blackstrap.

3. In a separate bowl mix all of the dry ingredients together: baking soda, salt, cinnamon, cloves, ginger, and flour.

4. Add the dry ingredients to your wet mixture and mix until you get your dough! yay you’re done! 

6. Before you can roll out your dough you need to refrigerate it for a few hours. I would recommend make a few disc shapes with it, and then wrapping it in plastic wrap, before putting in the fridge. This just makes for easy rolling later!

7. Once you're ready to make cookies, pre-heat your oven to 350 degrees.

8. Once your dough is chilled roll it out on to a lightly floured surface and give it a few good kneads - this will make the dough work a lot better. Just be sure to not incorporate TOO MUCH flour. Then you just roll it out and cut out your cookies! For softer chewier cookies you want to go for 1/4-1/3 inch dough. The thicker the rolled out dough the softer the cookie.

9. On a parchment lined baking sheet, bake your cookies in your pre-heated oven for about 10 minutes. However, depending on how hot your oven runs, you might want to do 8. Our new oven made the cookies a bit dark at 10 minutes so use your discretion. Also, a hint, these cookies can be hard to figure out if they are cooked or not because they are so dark as it is. However, I do feel the cookies lighten up when they are done baking so there is that (which is weird when you think about it…cookie gets darker when they bake not lighter right?). I try to go on the side of slightly under cooked than slightly overcooked as it makes a softer cookie. 


TIP* I refrigerated some of the dough (since when I was making them I was up till 2 am despite having work the next day ( #dedication ), and then about a week later I decided to make the cookies again and to my surprise they came out tasting EXACTLY the same! Awesome right? Just one thing I noticed is the cookies had a fewcracks on them that they didn’t have when I made them fresh. They weren’t a big deal, but I thought I should share. Also, it may just have been because I was too lazy to bother kneading the dough a few times again before rolling it out. SO do that if you choose to refrigerate the dough. And let this lazy girl know if it works out? ;)


P.S. Heres what happens when you are down to your last few cookies to decorate, you are running low on decorating ideas, and its 2 AM:


funny gingerbread men cookie design ideas. the horror! haha | Christmas themed gingerbread man cookies Make these deliciously soft gingerbread men cookies! Fun to decorate and great as gifts for christmas. Most importantly they are sooo soft and del…


The Best Easy One Bowl Brownie Recipe Ever!

Today for the first time in a really long time, I "entered the kitchen" again.


best one bowl brownie recipe delicious easy


See, back in the day, I used to be the kind of girl who would bake up 2-3 different treats a week - and would only limit myself to that number due to my parents' insistence that we would all die from diabetes if I didn’t stop. Every day I would rush home from my high school, and throw open all our drawers and cupboards to come up with something delicious to make. I would spend my lunch breaks at school browsing through the public library’s endless collections of cookbooks and lugging them back home with me. (yeah I was that girl)

When I went to University my love for the art of baking only grew. Only, so did my work load. By about a thousand. 

Despite this I was determined to make it work and would spend my breaks in between Uni classes looking up recipes online - which coincidentally also happen to be a lot lighter than those heavy cook books. And you also don’t have to remember to return them. And you don’t get late fees. The internet is pretty awesome aint it? :)

Along the way I decided to blog some of these recipes as a way to share these yummy finds, but mostly to keep track of and record them for myself. One too many times I had bookmarked a favourite recipe, only to come back and find out the site had gone down! *sad face* This way I was able to go back to my OWN blog (which I would obviously never destroy), to keep a record of all my favourite recipes. Thus my blog Edible Moments was born! 

However, somewhere along the way I lost something. The passion? The enjoyment? I don’t know. School got busy. Work got busy. Personal life got complicated. And when you add up full time school + full time work + 24/7 life stuff, pretty soon it can become pretty easy to lose the excitement that once came from a simple pleasure like baking yummy things and taking pretty pictures (16 year old Zahra would never have believed it!!). I was overcome with the stress of “what will I do with my future” and “why are things not working out the way I had meticulously planned them?!”, that there wasn’t much time to worry about what sort of sponge cake I would be making in between my Law midterm and PoliSci paper. It came to a point where the thought of getting up and taking out a mixing bowl and some measuring cups was so tedious, I would have rather washed the dishes. And let me tell you. Zahra don’t wash no dishes. Dishwashers wash dishes. 


brownie milk easy fast delicious yummy one bowl best recipe


Anyways, days became weeks, weeks became months, and before I knew it, it had been 2 years since I last posted on the good old blog. 2 years, 1 month, and 5 days to be exact! I contemplated even deleting the blog. It felt like its presence, and lack of updates was only adding to my sense of...blahness! But alas I couldn't do it - delete my baby??

Recently, in the past few months I have been thinking about getting back to it. Getting back to the blogging, the photography, and most importantly - the baking. However this realization could not have come at a worse time, as the family was in the middle of a massive kitchen renovation which meant we had no oven for a good 2 months. When I made the previous Strawberry Frozen Yogurt recipe (purely out of necessity since it was the only recipe I could think of that didn’t require an oven), I was suddenly reminded by the fun I used to have playing around in the kitchen. I realized I had let something that had been so enjoyable for me to just simply…slip away. And I wasn’t quite sure why. I vowed to try to slow things down a bit and at least try to enjoy life a little more. To stop stressing about everything all the time and make time for the fun hobbies I used to enjoy so much! 


So today, when I stepped in to the kitchen, determined to make this whole baking thing work, I realized something. When I am in the kitchen whipping up something yummy I get a strange sense of ‘inner peace’. I’m not talking about any of that yoga zen stuff, no, it’s a sort of “I’m just here doing my thing and I’m not doing it for x, y, or z reason. I’m just doing this just because I enjoy it”. And man. Is that a liberating feeling! But I also realized that some things have changed and that I needed a fresh start. The teenage Zahra who started Edible Moments wasn't the 23 year old typing this post. And thus, this is how this little wee blog has been born :)


I have therefore decided to promise myself something. I, Zahra, solely swear to keep with this whole ‘baking/crafting because I enjoy it’ thing. Because no matter how worried and preoccupied you are about which way your educational future should go, how your career prospects are forming, and what you are going to do with the million other little worries you have about the future, one thing is for sure - brownies will always be there for you :)


Now that I am done being sappy, and have let my mushy insides out for you guys, I present to you hands down the best-est, most yummy-est, and easiest one bowl brownie recipe you will ever find. Yes I know thats a big claim, and I don’t care. Its the truth y’all! This has been my go to Brownie recipe for ages. Ever since my high school days! Because no matter how many other amazing brownie recipes I try, nothing beats this one. Its super delicious, but also super easy, and was the ideal recipe to get me back in to the kitchen. 


brownie milk easy fast delicious yummy one bowl best recipe


Best One-Bowl Brownie Recipe

Ingredients:


* 1/2 cup butter or margarine, melted
* 1 cup sugar
* 1 teaspoon vanilla
* 2 eggs
* 1/2 cup all-purpose flour
* 1/3 cup Coco powder
* 1/4 teaspoon baking powder
* 1/4 teaspoon salt
* 1/2 cup chopped nuts (optional)
* Brownie Frosting
 

Directions:


1. Pre-Heat oven to 350°F. Line a 9-inch square baking pan with parchment paper.
2. Stir together the melted butter, sugar, and vanilla in a large bowl. Add the eggs and mix well with a whisk. Add in the rest of the ingredients. Alternatively,  you can do what I do (which is technically not one bowl but I don't mind) - stir together the flour, cocoa, baking powder & salt in a seperate bowl. Then gradually add to your brownie mixture, mixing until well blended. If you would like to use the nuts add them now.
3. Pour the batter in to your prepared pan and spread it around evenly. 
4. Bake for about 20 to 25 minutes or until brownies begin to pull away from sides of the pan or a toothpick comes out clean. Cool completely in the pan. 


Creamy Chocolate Frosting


* 1.5 tbsp softened butter 
* 1.5 tbsp coco powder
* 1 tbsp honey
* 1/2 tsp vanilla
* 1 cup icing sugar
* 1-3 tablespoons milk (depending on consistency)

Beat the butter, cocoa, honey, vanilla, and 1 tbsp of milk in a bowl until well blended and smooth. Add the powdered sugar and beat to a smooth spreading consistency. If its a bit dry feel free to add some extra milk.


Honest Comments on the Recipe:
I love this recipe. No way around it. Its my favourite go to Brownies because not only are they yummy they come together sooo easily. In addition to that, its the kind of no fuss, no muss recipe where you don’t need some crazy exotic ingredient from the Amazon to make - everything should be in your pantry already. This produces a soft, chewy, cakey sort of brownie. And the frosting is delightful!