Apple Tea Cake

Hey all!

Look at me posting twice in one month ;) Fingers crossed I can keep this whole blogging thing going!


So I know I just posted a post about healthy eating and here I am posting a cake recipe #Fail.

BUT this is a healthy cake! Kinda. See we have apples, which are a fruit. And we have ... umm...cinnamon which is a very healthy spice. And....and....we have GREEK YOGURT! That's right. Super healthy :)

The inspiration for this came about because I wanted to bake something 'Fall-ey' and whats more reminiscent of fall than big red apples? This cake didn't actually turn out quite the way I hoped, but it was still pretty good! I was hoping to get an extra moist and slightly lighter cake with the apple slices on top,  but it turned into a much heavier and denser cake. It still tasted lovely but wasn't quite what I was going for. I would categorize this as more of a heavier 'tea cake' - nice and dense and short, it would be really cute to have as a side with a cup of hot tea with some friends.

So if you are looking for a fall inspired apple cake recipe that is simple and easy to make but also looks really pretty too, look no further than this easy apple tea cake!


5.jpg


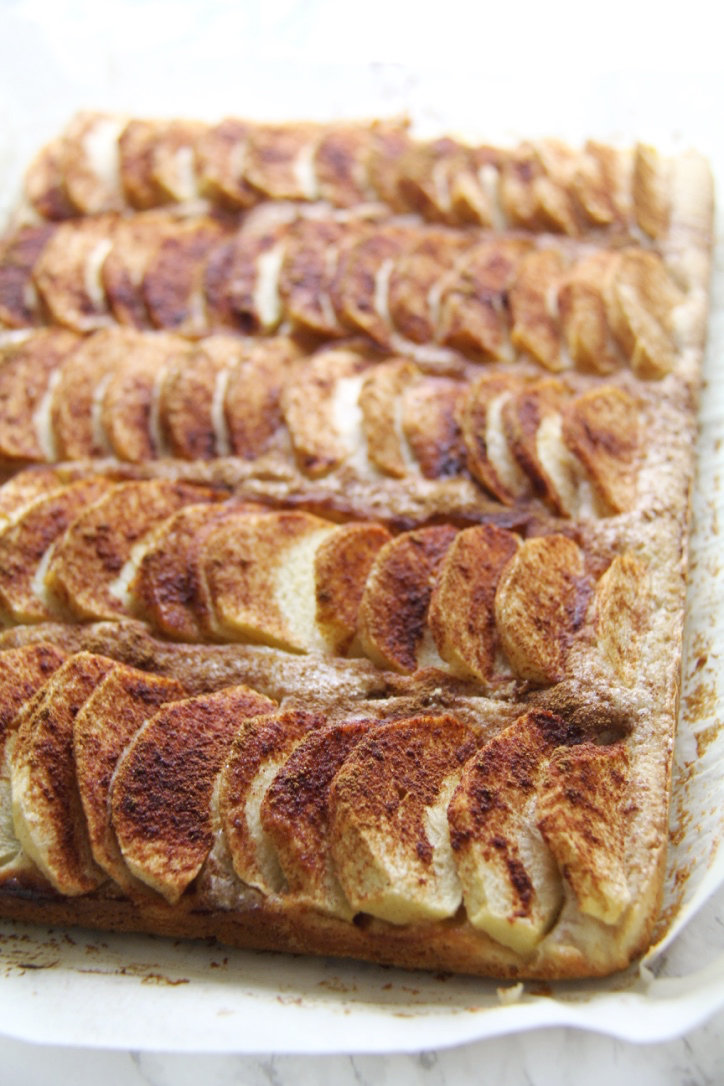
Simple Apple Tea Cake

  • 1 1/2 cups flour
  • 1 1/2 teaspoons baking powder
  • 1/4 teaspoon salt
  • 1.5 teaspoon cinnamon
  • 1/2 cup butter
  • 2/3 cup sugar
  • 2 eggs
  • 2 teaspoons vanilla
  • 1/2 cup Greek Yogurt
     
  • 4-5 apples
     
  • 4 tablespoons granulated sugar
  • Cinnamon to taste

     
  • Icing Sugar for dusting


1. Begin by mixing flour, baking powder, salt, and cinnamon until thoroughly blended. Set Aside.

2. Beat the butter and sugar together until light and fluffy. Mix in eggs, one at a time, until thoroughly blended. Add Vanilla. 
Note: If you have lumps or it looks kind of curdled its OK! Just keep mixing, and when you add the rest of the ingredients you should get a nice smooth batter.

3. Then mix in your dry ingredient and your greek yogurt alternating between ingredients. Add flour, add yogurt, add flour, add yogurt...continue until you have added all the ingredients. I found it helpful to throw in a bit of the flour mixture, then toss in greek yogurt by the spoonful. Mix until thoroughly combined.

4. Preheat your oven to 350. Line a 9x13 baking pan with parchement paper, extending it out a bit from the sides so its easier to take the cake out once its baked.

5. Spread batter into pan. It will be *really* thick. Just spread it around as evenly as possible throughout the pan.


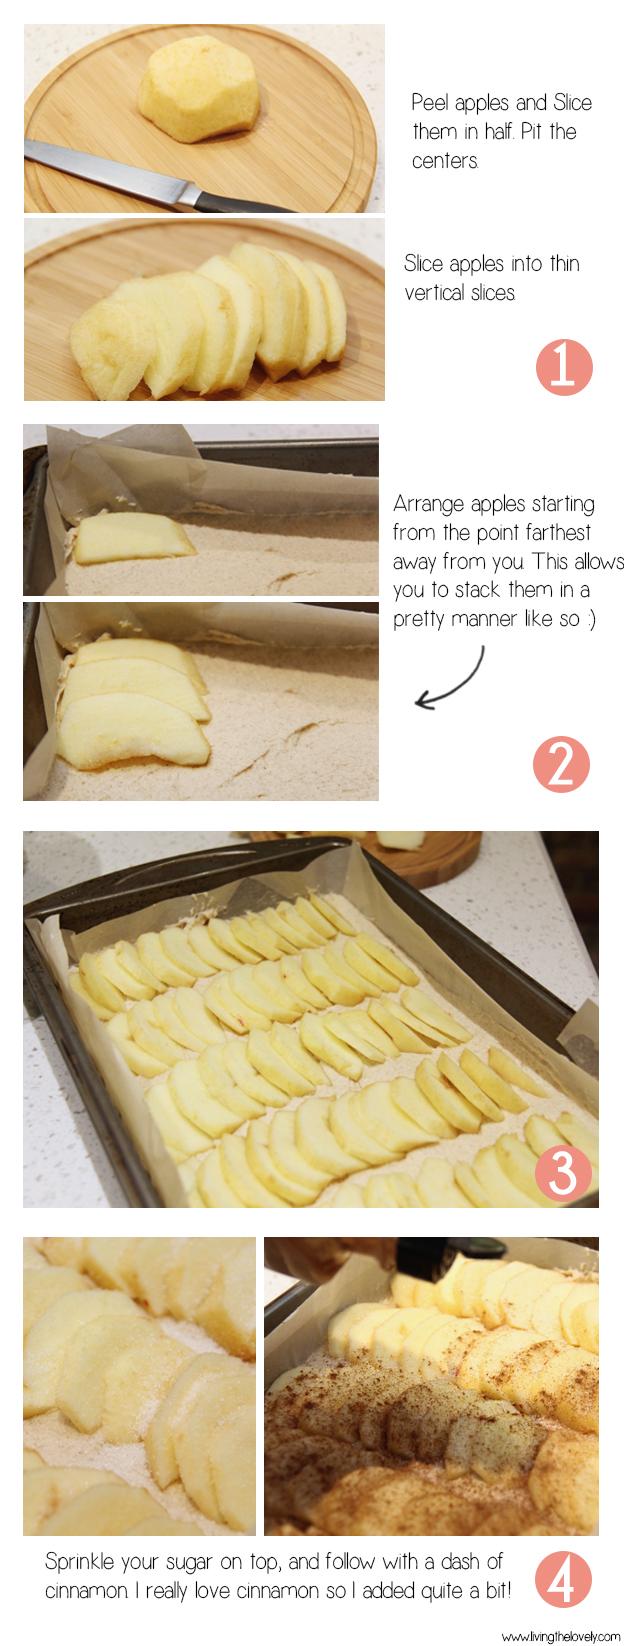
6. Peel and slice your apples and place on the batter.

Note on the apples: I find it looks 'prettiest' when you slice your peeled apples like this. First you slice them in half, and then you place them on your board and cut vertically down making lots of nice thin slices. I then find its best to arrange them on the cake starting from the corner farthest away from you and placing the apples towards you, rather than the opposite way. It still works the other way but its prettier this way :)

7. Bake in the oven for 30-40 minutes depending on your oven's temperature or until a skewer poked into the cake comes out clean AND the apples are nice and soft and baked.


8. Allow to cool at least slightly before sprinkling on some icing sugar! And Enjoy! :)


My journey towards healthy eating and a Quick and Easy High Protein Low Carb Sauteed Mushrooms and Feta Spinach Recipe

Its hard to eat healthy when it takes a long time to prep food. This is a REALLY quick and easy recipe that tastes so good but is diet friendly! High Protein and Fibre, and Low Carb !


So I have finally done it you guys.


I've taken the jump into the world of healthy eating, and healthy living. I'm officially a healthy eater!


Kinda.


Sorta.


Maybe....


Perhaps a more accurate description would be I have made the jump into the "I'm-actively-trying-to-make-healthier-food-choices-and-not-slowly-but-surely-killing-myself-with-the-immense-amounts-of-junk-food-and-calorie-laden-carbs-and-sugar-loaded-cakes-that-I-consumed-on-a-daily-basis-though-I-still-sometimes-cheat-and-stuff-my-fat-face-with-delicious-junk-food" bandwagon. But you see, to say I have become a "healthy eater" is just so much easier.

Perhaps an explanation is in order? You see I've never had the 'worst' diet in the world, due basically to the fact that I have a mother who has always emphasized using 'healthy' and 'whole' ingredients, and banned all forms of fast food and junk food in the house since I was a kid. She was able to successfully condition us as children to avoid junk food to the point where we would not even ask for it as we knew the answer was no. If 10 year old Zahra were to pick up a box of Dunk-a-roos in the grocery store, with the hopes of whining pleading my case enough for them (but MA! EVERYONE IS EATING THEM), I would then put it right back down without trying to argue because I knew the answer was not only "NO", but would also be followed up with a speech about how I would get cancer from eating these delicious cookies + dip combo. Chips? Nope. Coke? Don't even think about it. Fruit Roll ups? HAHAHA you mean chemically infused rubber that will give you cancer AND LITERALLY KILL YOU?


You get the idea.


It came to the point where the idea of "OMG LETS HAVE A YUMMY TREAT" was having an organic yogurt fruit cup.


So then fast forward to a few years ago when I finally became independent and in charge of what I ate in my university years. Having the cash and the opportunity, I started to eat whateverrrrr I wanted. And man. Did I make up for lost time. Pizza? Double cheese please! And a side of greasy fries please. And a Coke. XL. McDonald's? Superzie Me? SUPERSIZE YES!

And as a result....the weight started piling on.....Freshman 15? More like Freshman 20.


And things only got worse when I left school and joined the workforce. At least in school I had to *walk* to class. Not here friends, not here. My commute consisted of walking 10 meteres to the bus stop in the morning, sitting on the bus, getting off and walking 10 meteres to my building, sitting for 8 hours, and busing back home. Meanwhile my snack drawer at work (yes I had a snack drawer) consisted of a selection of cookies, brownies, poptarts, DUNKAROOS (FOR YOU 10 YEAR OLD ZAHRA! FOR YOOOOUUU!), chips, chocolate stuffed croissants (thanks Costco), and oatmeal. Cause, you know, oatmeal is healthy right?


As my weight crept up, and my energy levels fell, I was in denial. See the thing was, I was blessed with this wondrous rare gift that can be bestowed on any woman - a super high metabolism and good genetics. When I started University I weighed 100 pounds. 100 pounds! And at roughly 5'5' that put me at BELOW the average BMI! It was all thanks to great genetics - my sister was tiny, and even my mom had been teeny tiny when she was younger! It was the GREEN light I needed to stuff my face. And stuff my face I did friend. Stuff my face I did.


As the weight started to pile on I ignored it. Honestly I never even weighed myself. I noticed my clothes getting a tad tighter....but I figured I outgrew my high school clothes and that this was a chance to buy a new Uni wardrobe! wee! then I realized one day I was 115 pounds, and I wasn't even remotely worried. I was all "PSSH!! This is a GOOD thing. I need some extra meat on my bones. In fact...I need even MORE meat on my bones!" Before I knew it I went from a size XS to a M. "Pshh. Thats fine...."I would say, rather defensively. "I, uh, as a Medium, I am NORMAL, sized individual. I'm still a HEALTHY size!"  :D Then....it just kept coming....in the first year out of school I gained another 15 pounds. FIFTEEN POUNDS. In less than 8 months. Thats when it slowly started to hit me that eating junk every day may not be so 'ok' as I had previously convinced myself. Maybe my beloved mother was on to something when she said NO to the sugar packed junk foods I so deeply desired? I evaluated my diet and realized I was making some pretty poor choices. So I figured, huh.....maybe I should cut out having a coke every day with my meals? Maybe that will stop me from gaining all these pounds. Maybe I should make some healthier choices, like instead of heading to McDonalds for lunch, I will make a Subway Trip. Instead of having a chocolate chip muffin (or two) for breakfast I'll have a FRUIT muffin. Then I will go right back to the weight I was. Yeah. That will do it!


It didn't do it.


It kept coming on. Now those of you who are healthy eaters may be rolling your eyes at me like "NO? Really? You thought stopping having a coke a day and opting for a processed fruit muffins over chocolate flavoured ones would make you skinnier? Oh no. I wonder why it didn't work??" *eye roll* Well heed your sarcasm - I know NOW how wrong I was! But alas I had to wait until that winter to hit rock bottom before slapping myself awake into reality.


Oh God. So sometime this past January I had pulled out some winter clothes I had in storage. I had bought them BRAND NEW the previous year after some major sales in the early spring. Since it was the end of winter at that point I had packed them up, tags still attached, and put them in storage.  Keep in mind that when I had purchased them the previous year they were a tad large (that's the way I like my clothes - I prefer baggy rather than skin tight). So I take them out of storage, and put on these brand new clothes, with their tags still attached, and it.....wouldn't fit. IT JUST WOULDN'T FIT ME. Like sure, I could squeeze into them but it was really tight and uncomfortable and looked like I was wearing the completely wrong size of clothing . That was my slap-in-the-face-wake-up- call. In less than a year I had ballooned in size, and clothing that was very comfortable one year, simply  WOULDN'T FIT less than a year later.


That's when I decided I needed a change. I started googling. Started learning. Started understanding WHAT I was putting into my body and what it was doing. Turns out half the 'healthy choices' I thought I was making? WERE HORRIBLE for me! It soon became apparent why I was gaining so much weight in such a short duration of time.


So I decided, that starting January 2015, I would start *trying* to eat a healthier diet. I educated myself on what sorts of foods were good choices, and what were bad. And trust me, me and my sweet tooth cheated plenty. But despite this, I still managed to stop gaining weight, and even lose some of it too!


My experience these past 10 months has shown me that the biggest obstacle to healthy eating is the availability of it. If you come home for dinner and you're starving, chances are you will reach for unhealthy snacks to fill you up, rather than wait 2 hours to make a healthy meal. Since then I have come up with several different recipes that are fairly quick and easy to make (without complex ingredients) but are high in protein and fibre (the good stuff) and low in carbs (the bad stuff). I hope to be sharing more of them with you on the blog soon! :)


Now on to this recipe. I have found that the best type of diet to adapt is one that is high in protein and fibre and low in carbs. The reason for this is that protein and fibre tends to keep you full and satisfied much longer than carbs, and in turn leads to less feelings of wanting to stuff your face. :) Carbs, though good in moderation, can lead to problems in the long term including weight gain.


This is a really quick and easy recipe that comes together within minutes. Its a great side to a main meal or can even be the main attraction as a light lunch or dinner.


Really Quick and Easy Healthy side or as a main course. Low Carb but high in protein and fibre! www.livingthelovely.com


Sautéed Mushroom and Feta Spinach Side


(note that this recipe is more of a general guideline - that means the measurements for the ingridents REALLY doesn't matter! :) you can adjust based on the amount you have on hand or how much you want to make, or simply what you prefer to have more/less of. If you want more spinach, add more. If you don't like mushrooms, add less. Its very flexible :) )

* 1 pound of spinach
* 2 cup of chopped mushrooms
* 2-3 tablespoons of chopped feta cheese
* 1-2 cloves of garlic, finely diced
* 1 medium onion + oil to fry with
* Garlic powder to taste
 

1. Slice your garlic cloves and onion up, and sauté it over medium heat with whichever oil you want to use (I prefer coconut) until the onions are slightly brown.

2. Add your chopped mushrooms and cook until slightly brown. When they are about 1-2 minutes to being cooked, throw in your spinach. It may seem like 'too much' spinach as you're throwing it in and it may seem to be overflowing but its OK! When spinach cooks it looses a LOT of volume!

3. Continue to fry until the mushrooms are cooked an the spinach has turned a dark green. Add some Garlic to taste. I like it garlicy so I tend to add a lot! (and add  salt and pepper if you wish).

4. Remove from heat and empty contents of pan into a bowl. Throw in your chopped feta cheese and combine.

5. That's it! You've made a really quick and easy (and HEALTHY) side (or meal) in minutes! Yay You :)


And heres a video I made of the quick process :)


Really Quick and Easy Healthy side or as a main course. Low Carb but high in protein and fibre! www.livingthelovely.com


Quick and Easy Homemade Guacamole Recipe

Well then….its been a while hasn’t it? ;)

A super easy delicious guacamole recipe you can easily make at home! Once you try this recipe you wont want to eat store bought anymore! Comes together really quick too! || www.livingthelovely.com

Seasons have changed, and have so many other things in my life, ranging from my ever changing career to crazy family life, to finally changing my diet and lifestyle to a much more healthy one (yeah I still can't believe it either!). And though the experiences of the past few months have been really great life experiences, it has caused me to have to put this little wee blog on the backburner. But never fear I am back, and with this newly found concept called ' a little free time' and a whole lotta passion and ideas to get back to making some lovely things!


So without further ado, lets dive right into some good stuff. And believe you me….this is some good stuff! Riding along on the tails of the whole 'I'm going to eat healthy' thing, here's a super yummy, super healthy, and most importantly, super easy guacamole recipe to get us going. Before recently I had never had any 'fresh' or homemade guacamole. I lived a meaningless life filled with store brand, sat-in-a-grocery-store-refrigerator-for-weeks-before-I-bought-it, and preservative packed guacamole. However once you have some homemade guac there is really no going back. The best part about homemade guacamole is that you can control all the different flavours. Want more of a sour taste? Squeeze a bit more lime. Want more chunk in your guac? Add more tomatoes! More heat? Up your garlic and onion. It's all up to you baby. You're in control here.


But what's the best part about homemade guacamole? It's just how EASY it is. I never use a 'recipe' and usually just eyeball it – you can't really get it wrong. But just for you very special people, I have devised a set proportion of ingredients to help you get going – but by all means feel free to add or subtract to taste.

A super easy delicious guacamole recipe you can easily make at home! Once you try this recipe you wont want to eat store bought anymore! Comes together really quick too! || www.livingthelovely.com


Easy Homemade Guacamole

(this recipe makes a small bowl portion (approx.. 2 cups) as I usually make it with, say, 2 avocados, but you can make more or less depending on how many avocados you have on hand)

* 2 avocados

* 1 lime

* 1 tomato (if you want it to be less chunky then probably ½ tomato)

* 2 tablespoons chopped onion

* 2 garlic cloves

* 1.5 tablespoons of cilantro

* Salt and Pepper to taste


1. Begin by pitting your avocados and scooping out all of the flesh. Place in a bowl and start mashing with the back of a fork. (Or do what I did and enlist your younger brother to mash the avocados for you :) )


2. Finely chop your garlic, onion, and cilantro. Chop up your tomatoes to desired consistency – I like my guacamole to be nice and chunky so I tend to cut tomatoes into slightly larger chunks.


3. Then throw everything in together and mix! Add in your lime juice, starting with half a lime first, and adding more as needed. I find that sometimes, some limes have a lot more kick, and other times they are a bit more watered down. This time I used only half. Add salt and pepper to taste.


* One thing to keep note of is that once you scoop out avocados they turn brown pretty quickly. Despite the added lime juice (which usually preserves cut fruits and veggies longer), the avocado part of the guacamole can go brown pretty fast so be sure to consume it within 24 hrs. And this fun fact is another reason why I will never buy store bought guacamole again. WHAT HAVE THEY ADDED TO IT THAT IT STAYS GREEN FOR WEEKS?!?!

And that’s it! You have some delicious and nutritious guacamole!


guacamole recipe ingridients 1.jpg
step by step instructions for some fast and easy home made guacamole recipe | www.livingthelovely.com
fast and easy home made guacamole recipe | www.livingthelovely.com
home made guacamole recipe. super fast and easy and sooo yummy! | www.livingthelovely.com


Strawberry Sunshine Tea Cake

Over the weekend I headed in to the kitchen with the intention of baking up some sort of cake. I was in the mood for something smooth, and fluffy, and, well, cakey. However, I didn’t have any specific recipe in mind as I kept opening and closing the same kitchen cabinets, trying to find something to inspire me. I knew I wanted cake, and I knew a nice Valentines Day theme would be cute, and I was also thinking about something ‘cheerful’. “What? How can cake be cheerful??” I hear you cry, very easily I reply, it has to make you smile. Or something like that. You know how a yummy berry fruit tart makes you think of lovely summer, or how a peach crumble pie makes you think of a sunny spring weekend? Well I wanted to feel me some sunshine cause the reality of -35C weather outside just wasn’t cutting it. That’s when I saw the bowl of strawberries in the back of our fridge and it hit me – strawberries! Sunshine! Oh joy! I will make a strawberry cake.

strawberry tea cake | www.livingthelovely.com


Then I set about on Pinterest looking for the perfect recipe – which turned out to be a bad idea. Not only did I not find the type of recipe I was looking for (think a soft summery strawberry tea cake), I ended up side tracked an hour later looking at an article on what my personality type was, and what career I am best suited for (apparently I would make a great Carpenter or Mechanic – which is surprising given that I can’t tell the difference between a wrench and a screwdriver half the time). Frustrated with the inability of the internet to tell me WHAT I SHOULD DO WITH MY LIFE, I went back to figuring out what on earth I was gonna make. I finally settled on making an old classic I had made before at my previous blog, a simple strawberry tea cake. However, taking note from my previous attempt, I decided to make some changes to make the cake more moist (it had turned out a tad dry previously).


I decided this would be a great opportunity to use some Greek yogurt to not only make this cake moist, but also somewhat healthier (hey every bit helps right?). I was pretty happy with the final result! I decided to give it a Valentines Day theme by being all classy and cutting the Strawberries into thin slices and decorating with borders around the cake. I also made a little strawberry heart in the center. How cuutttteeeee right?


How it turned out: This recipe turned out pretty great! If measuring by nothing but the fact that it was all gone about 20 minutes after I took these pics, I would say the family loved it! The Greek yogurt did a great job of adding the moisture I was looking for. This produces a really great rich and dense cake, which would be a great ‘tea cake’ in my opinion. So if you are looking for a summer strawberry tea cake recipe, give this one a go! Also, this produces a bit of a sweet cake, so if you would like you could probably cut out ¼ cup of the sugar and still be good.


strawberry tea cake | www.livingthelovely.com

Strawberry Tea Cake

Ingredients:

1/3 cup unsalted butter, at room temperature

1 1/2 cups all-purpose flour

1 1/2 teaspoons baking powder

1/2 teaspoon salt

1 cup granulated sugar

1 large egg

1/2 cup Greek Yogurt *or substitute the water + Greek yogurt for 1 cup of regular Yogurt

1/2 cup of water

1 teaspoon vanilla

 2 cups of strawberries (or less or more depending on what you like)

1 tablespoons sugar, for sprinkling on top of the strawberries

Some Icing sugar to dust on the cake once its baked.


Directions:

1. Preheat oven to 350 degrees. Line your cake pan with parchment paper. 

2. Sift flour, baking powder, and salt together into a separate bowl. Set aside.

3. Sprinkle some sugar over your strawberries if they aren’t naturally very sweet like mine, and set aside.

strawberry valentines day cake | www.livingthelovely.com

4. Mix your greek yogurt and water together in a bowl until the lumps have mostly dissolved. Set aside.

greek yogurt add to batter

5. Beat your butter and 1 cup sugar in a bowl with an electric mixer. Mix until pale and fluffy. Add in egg, Greek yogurt/water mixture (or instead use 1 cup of regular yogurt), and vanilla. Mix until well combined. Now when you add your yogurt mixture to the batter it may make it look super gross. Like its curdled and gone bad or something. ITS OK. Just continue. Trust me on this.

6. Gradually mix in your flour mixture to the gross looking buttery mixture. (tada! It now looks like a really good thick cake batter).

7. Transfer the batter into your pan (It’s a really thick batter so its ok if it resembles something like a very soft bread dough). Arrange your strawberry slices on top of the batter.

8. Bake in the oven for about 20-25 minutes. Be sure to adjust baking time for a hotter or cooler oven.  Bake the cake until a toothpick entered in the center of the cake comes out clean. This cake actually ends up with a pretty white top. If you prefer a golden topped cake, put it under the broiler for a few minutes like I did. (tastes great either way)

9. Once cake is COMPLETELY cooled, sprinkle on some icing sugar to make it extra special

The Classic Original Chocolate Chip Cookie Recipe

So the other day I headed in to the kitchen with a lot of excitement on what I should make. My Tiramisu recipe? Soft buttery shortbread cookies? Lemon squares? ginger molasses  bars? options! options! As I pondered my options out loud to my brother he said "Well, those are all great and all, but can't you make something normal for once?" I thought this was funny as this is the same guy who inhales everything I bake, and then asked for thirds, fourths, and tenths. This was the first time I hear any such complaint or suggestion from him. But as I thought about it, I realized it had been quite a while since I went "classic". I asked him what exactly he meant by "something normal" and he immediately retorted "CHOCOLATE CHIP COOKIES!" (clearly he had been holding on to this!)


"Ok," I said "What kind of chocolate chip cookies? Soft and chewy? Thin and crispy? OOOH how about CAKEY cookies those are awesome! And maybe we can add walnuts?" His reply: "NO! I said NORMAL! Just a NORMAL chocolate chip cookie. Nothing crazy fancy with weird ingredients. I JUST want a cookie!"

Well alright then.


The Fast and Easy Recipe for the first ever Chocolate Chip cooke recipe ever! This is the original recipe accidentally created by Mrs. Wakefield in the 1930's.....and its delicious! A perfect classic chocolate chip cookie....because it is! | www.liv…


Normal and nothing crazy? Well that means we need to go with a classic chocolate chip cookie recipe! And what better than the ORIGINAL, must classical cookie you could get - the first every chocolate chip cookie recipe! There are various stories as to what really happened and how the actual cookie was invented, with some saying it was a brilliant accident, to others claiming it was created on purpose. One things for sure, however, and that is that chocolate chip cookies were invented by Ruth Graves Wakefield in the 1930s. (lets all take a minute and say “Glory be the thee Mrs. Wakefield!”) One story goes that Mrs. Wakefield  was in the kitchen of the Toll House Inn (an Inn she owned with her husband) and was planning on make a batch of her Chocolate Butter Drop Do cookies to serve to her guests. But as she was in the middle of baking the recipe, Ruth discovered she was out of baker’s chocolate! Ruth then tried to save the batch by adding some chopped up Nestlé chocolate that had been given to her by Andrew Nestlé of the Nestlé Company. (Lets take a moment and appreciate how awesome it is that Mrs. Wakefield personally knew a family member of the Nestle corporation. I would totally be name dropping up in the blogosphere if it were me! …which come to think of it is probably why its not me…) Anyways, Ruth had expected the chocolate she added to the batter to melt and disperse through the cookie dough, but of course it did not! And thus the invention of the brilliant chocolate chip cookie!

Oh, but you know what this means don’t you? My brother was being all up in my face about stopping my experimentations, and going classic…. Where in reality, the chocolate chip cookie was discovered due to someone’s creative experimentation! :)


Hope you enjoy them!


The Fast and Easy Recipe for the first ever Chocolate Chip cooke recipe ever! This is the original recipe accidentally created by Mrs. Wakefield in the 1930's.....and its delicious! A perfect classic chocolate chip cookie....because it is! | www.liv…


Classic Nestle Chocolate Chip Cookies

 * 2 1/4 cups  all-purpose flour

* 1 teaspoon  baking soda

* 1 teaspoon  salt

* 1 cup (2 sticks) butter, softened

* 3/4 cup  granulated sugar

* 3/4 cup  packed brown sugar

* 1 teaspoon  vanilla extract

* 2  large eggs

* 2 cups (12-oz. pkg.) NESTLÉ® TOLL HOUSE® Semi-Sweet Chocolate Morsels

* 1 cup  chopped nuts (I didn’t add these for obvious brother-hates-nuts reasons)


Instructions : I thought since this is an original recipe, you should check out the official nestle website for the instructions if you would like to make them :) INSTRUCTIONS HERE


This provides the perfect classic, original type of chocolate cookie, because it was! Enjoy and let me know what you think :)


**TIP: I find if you microwave the cookies for 10 seconds before eating makes them SO amazing and melty in your mouthy :) 
 

And lookie here! My first ever youtube video! Showing you step by step how its done :)